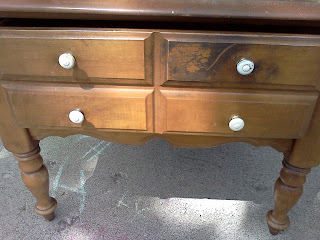
I'm not one to take things off the street during neighborhood clean up week, but I made and exception just this once. Honestly, I was running to the grocery store after all the kids were in bed. It was raining but almost cold enough to snow. I saw this lovely side table on the side of the road and on my way back from the store, after contemplating should I take it or not, I told myself if it was still there I would pull over and get it.
Well, it was still there! So in the dark of the night and the freezing rain I get out and put it in my car. Now my trunk was full of groceries and it barley fit into the back seat of our little sedan. I was just about to leave it behind because it was that difficult to squeeze in.
And several months later as it sat in my garage I finally got the energy to start on this project.
Of course I started this project and thought, "oh pictures". So the top of this table looked normal other then some black like stains you see on the drawer. I also had to use some wood glue and nails to help repair the drawer. When I got it home the drawer wouldn't open at all.
I was about to hand sand it when luckily my father-in-law came over to help with our basement and said he had an electric sander. That made my day! It took all of maybe 15 minutes to sand the top and get all the varnish off.
I didn't worry about the base and legs because I am going to do a little sanding on them and then prime and paint those. Stay tuned to see the color. (should I go white or some fun color?)
After I sanded, I cleaned the top and put one coat of dark walnut stain on. Sorry for the poor picture. I was outside and the shade of our trees ruined the picture.
Part 2 coming soon!


No comments:
Post a Comment