Monday, June 10, 2013

Furniture Restoration Part 2

Remember the Before....it's starting to look better.  If you want to refer back to part 1 click here.


I need to remember to take pictures.  I had already put two coats of Primer on and waited a couple of days before I started to paint.  I started with my painting and remembered I needed to take pictures of the primed paint job.  (I will give all the information of products I used below).  


I had started painting and it was already turned over and I couldn't turn it over again because of the wet paint.  But above is the primed portion.


Primed drawer


I wanted to add some color, so I spray painted the inside of the drawer after I primed and before I painted. 


Above: This has been primed twice and painted once.  I got a little paint on the stained top portion and I will go over what I did if you keep reading!


The painted drawer.


Close up of the paint on the stained top.  I need to be better about touching already done surfaces with my hands for support while I paint.


Not the best picture, but this is after I sanded the painted areas on the top and the sides where the tape didn't do so great of a job.


After I sanded the top, I re-stained.  I didn't worry about getting on the white paint because I had a baby wipe handy.  I simple wiped it off.


The wiped clean edge.
 
What I used
 
Stain:
Min Wax Dark Walnut Stain
 
 
Primer:
Zinsser Oil Primer
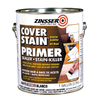
Zinsser Gallon Interior Oil Primer
 
Paint:
Rust-Oleum Oil Gloss White
 
 
Spray Paint for Drawer:
Krylon Island Splash
 
Krylon Island Splash Indoor/Outdoor Satin Spray
 
Of course you will need Paint brushes and for the oil a paint thinner to clean the brushes if you want to keep them.
 
 
Part 3 The finished product will be coming soon!!!

Thursday, June 6, 2013

DIY Kid Noise Makers (that are quiet)!

 
I needed some noise makers for my kids favorite song.  This was the perfect solution because they make noise but it is oh so quiet!


First: take some rice


Second: Get tape. I used electrical and washi tape.


Third: Fill the eggs half way with rice and use the electrical tape to go around once or twice.


Fourth:  Use your washi tape for the finishing touch. 


The washi tape didn't go around as easily as the electrical tape.  Next time I might try to find some white electrical tape and just use that instead.  I had all of these things at home so I don't know what it would cost?  My husband might not be so happy with me that I use the electrical tape :)


Monday, June 3, 2013

DIY Wall Art

I need something to cover a blank wall.  I need to make it inexpensive and quick.
What to do??
I built this canvas about 10 years ago.  I was bored with what I had painted on it back then.  So I spray painted over it with gray spray paint. 


Found some old material that I had tied into a long strand.


Wrapped it around the canvas in no particular order and started to spray paint.  I used turquoise (official name: Island paradise) spray paint.  For some reason I have recently really loved this color.


I sprayed turning the canvas after each coat, so I could get each side. 


And the finished piece of art!  


Now my wall is not so open and blank.  The thing I love most it didn't cost me a cent.  I already had all the supplies. 
 
Even if I had to buy the supplies, the spray paint would have been $6, canvas $10 (or less with coupons) and material or tape maybe $2.   A project less then $20 if you have to buy everything.