Showing posts with label Furniture Restoration. Show all posts

Saturday, July 6, 2013

Rocking Chair Redo

Wow...it has been awhile since I last posted.  Vacation, sickness and just summer fun has slowed down my posting. 

 I have a fun new project that I recently finished.  I bought this old rocking chair at a yard sale for $15.00.  What a deal.  It did need some work and now it is all done!  Material and padding cost a total of $ 25.00.  So grand total for the new chair (to me) $40.00.


What you need:
 
1. Material of your choice.  I used upholstery fabric
2. Heavy duty stapler and staples
3. Foam square, I used 3 inch thick
4. Board that fits to your chair
5. Quilt batting
6.Hammer


This board was on the rocking chair.  Not in the best of shape, very thin and broken.


Luckily my Husband is pretty handy for me.  He cut out my new shape with some extra wood we had around the house.


I forgot to take pictures before I started.  This was the size of foam I used.  I traced the shape of the wood then used a serrated knife to cut my shape.


Finished shape.
 
 
Place foam and wood together.


Lay foam own onto quilt batting.


Pull batting taut on ones side and start stapling (I start on one side in the middle and staple that side.  I then move to the opposite side and staple that side).
 
 
Corners are tricky.  I fold one side across and then pull the other side up and over.
 
 
This creates a clean edge.


Hammer every staple that you have to make sure it is tight against the wood.


Cut off any excess batting.


Almost finished seat.  I didn't want to leave the wood exposed so I found some extra material to staple on the bottom.  With little kids crawling under things I wanted to avoid slivers.


I stapled this material and cut off excess then hammered nails once again.


For the finish material I folded the ends under to have a cleaner look.  Same steps as the batting.  Start on one side in the middle and then move to the right and left stapling. Then go to the opposite side.   I also had to cut off excess fabric along the corners.  It also helps to have an extra pair of hands.  My husband would pull taut and I would staple has he held.


Underside of finished seat.
 
 
My finished rocking chair!


Monday, June 10, 2013

Furniture Restoration Part 2

Remember the Before....it's starting to look better.  If you want to refer back to part 1 click here.


I need to remember to take pictures.  I had already put two coats of Primer on and waited a couple of days before I started to paint.  I started with my painting and remembered I needed to take pictures of the primed paint job.  (I will give all the information of products I used below).  


I had started painting and it was already turned over and I couldn't turn it over again because of the wet paint.  But above is the primed portion.


Primed drawer


I wanted to add some color, so I spray painted the inside of the drawer after I primed and before I painted. 


Above: This has been primed twice and painted once.  I got a little paint on the stained top portion and I will go over what I did if you keep reading!


The painted drawer.


Close up of the paint on the stained top.  I need to be better about touching already done surfaces with my hands for support while I paint.


Not the best picture, but this is after I sanded the painted areas on the top and the sides where the tape didn't do so great of a job.


After I sanded the top, I re-stained.  I didn't worry about getting on the white paint because I had a baby wipe handy.  I simple wiped it off.


The wiped clean edge.
 
What I used
 
Stain:
Min Wax Dark Walnut Stain
 
 
Primer:
Zinsser Oil Primer
Zinsser Gallon Interior Oil Primer
 
Paint:
Rust-Oleum Oil Gloss White
 
 
Spray Paint for Drawer:
Krylon Island Splash
 
Krylon Island Splash Indoor/Outdoor Satin Spray
 
Of course you will need Paint brushes and for the oil a paint thinner to clean the brushes if you want to keep them.
 
 
Part 3 The finished product will be coming soon!!!

Thursday, May 30, 2013

Furniture Restoration Part 1

 
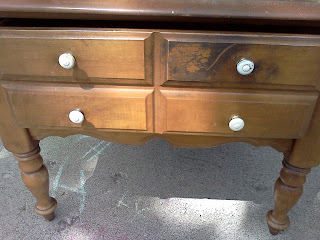
I'm not one to take things off the street during neighborhood clean up week, but I made and exception just this once.  Honestly, I was running to the grocery store after all the kids were in bed.  It was raining but almost cold enough to snow.  I saw this lovely side table on the side of the road and on my way back from the store, after contemplating should I take it or not, I told myself if it was still there I would pull over and get it.
 
Well, it was still there!  So in the dark of the night and the freezing rain I get out and put it in my car.  Now my trunk was full of groceries and it barley fit into the back seat of our little sedan.  I was just about to leave it behind because it was that difficult to squeeze in.
 
And several months later as it sat in my garage I finally got the energy to start on this project.
 
Of course I started this project and thought, "oh pictures".  So the top of this table looked normal other then some black like stains you see on the drawer.   I also had to use some wood glue and nails to help repair the drawer. When I got it home the drawer wouldn't open at all.


I was about to hand sand it when luckily my father-in-law came over to help with our basement and said he had an electric sander.   That made my day!  It took all of maybe 15 minutes to sand the top and get all the varnish off.


I didn't worry about the base and legs because I am going to do a little sanding on them and then prime and paint those.  Stay tuned to see the color.  (should I go white or some fun color?)


After I sanded, I cleaned the top and put one coat of dark walnut stain on.  Sorry for the poor picture.  I was outside and the shade of our trees ruined the picture. 
 
 
Part 2 coming soon!